

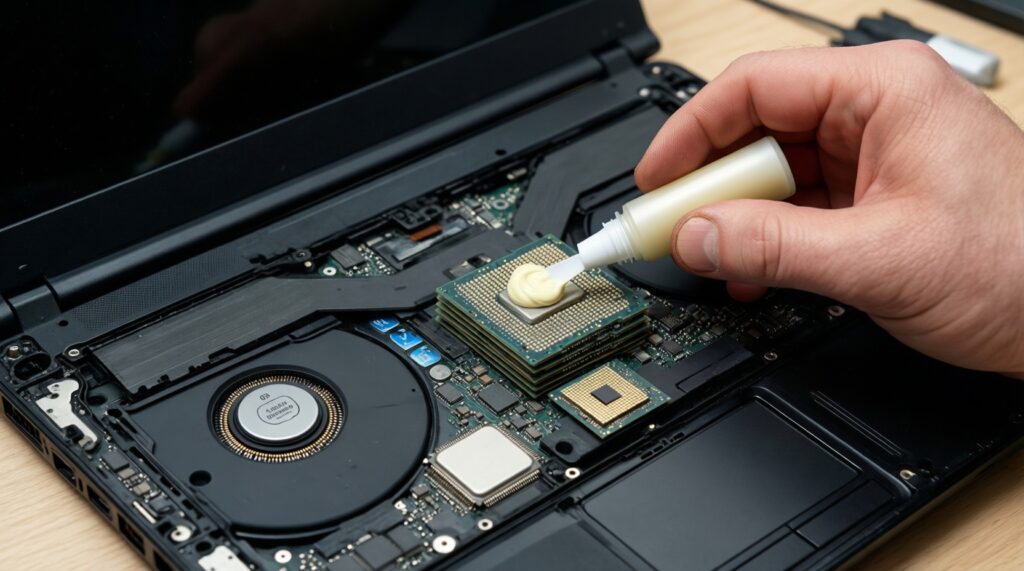
Replacing thermal paste or thermal pads improves heat transfer between the chip and heatsink, helping reduce throttling and stabilize fan noise, which can extend device lifespan. Do it when temperatures climb or performance drops under the same workload. The job is safe if you control ESD, track screws, and use the correct pad thickness.
Quick Orientation: Expected Gains, Risks and Measurables
- Measurable target: lower peak temps and steadier clocks under the same stress test run before/after.
- Most common win: reduced thermal throttling and fan spikes after เปลี่ยนซิลิโคนระบายความร้อน.
- Main risk: wrong thermal pad thickness can prevent full heatsink contact and make temps worse.
- Budget reality: ซิลิโคนระบายความร้อน ราคา varies by brand and conductivity class; buy reputable, not the cheapest unknown.
- Shopping note: แผ่นนำความร้อน thermal pad ราคา depends heavily on thickness and size-measure before ordering.
- Stop conditions: if you see torn connectors, swollen battery, or liquid damage, pause and consider professional service.
When to Replace Thermal Paste or Pads: Symptoms and Diagnostic Metrics
Time: 10-25 min diagnostics. Difficulty: Easy (no disassembly).
- Replace paste when CPU/GPU temperatures rise noticeably compared to your own previous baseline under the same load, or throttling starts earlier in a stress test.
- Replace pads when you open the device and pads are cracked, oily, torn, compressed unevenly, or sticking to the wrong surface.
- Confirm with repeatable tests: run the same game/benchmark/stress test for the same duration; log peak temperature, average clock, and fan behavior.
- Noise and stability signals: sudden fan surging, random shutdowns under load, or performance dipping after a few minutes can indicate degraded interface material.
Do not proceed if any of the following is true (until you mitigate it):
- You cannot identify screw locations or you lack a teardown reference for your exact model.
- Your device is under warranty and opening it could affect coverage.
- You do not know the original pad thicknesses and cannot measure them.
Selecting the Right Thermal Paste or Pad by Device and Load Profile
Time: 10-20 min planning. Difficulty: Easy.
- Paste type: choose a non-conductive, non-capacitive paste for general safety. Avoid electrically conductive compounds unless you are experienced and the application area is well-controlled.
- Pad selection: match thickness first, then softness/compressibility. If you change thickness, you may lose heatsink contact on the die.
- Desktop (CPU/GPU): paste is primary; pads are typically for VRM/VRAM on GPUs.
- Laptop: you usually need both paste (CPU/GPU) and pads (VRM/VRAM). If you're considering a ร้านเปลี่ยนซิลิโคนโน้ตบุ๊ก, ask whether they measure and match pad thicknesses instead of "one thickness fits all."
- Consoles: follow model-specific guidance; many units use a mix of paste and pads, and screw torque pattern matters more than people expect.
- Compatibility note: "Thermal putty" is a separate category; do not substitute pads with putty unless you know the exact intended use and clearances.
- Buying checklist: paste, pads in the right thickness, isopropyl alcohol (high purity), lint-free wipes, and (optional) a plastic spudger.
For shopping terms, you'll see ซิลิโคนระบายความร้อน คอมพิวเตอร์ used broadly; prioritize known brands and fresh stock over marketing claims.
Tools, Workspace and Safety Checklist for Disassembly and ESD Control
Time: 15-30 min setup + 20-60 min disassembly access. Difficulty: Medium.
Prep checklist (do this before any screw is removed)
- Back up important data and shut down fully (no sleep/hibernate); unplug charger and all peripherals.
- Work on a clean, bright surface; prepare screw organization (labeled cups or a drawing).
- ESD control: use an anti-static strap if available, or regularly ground yourself on an unpainted metal surface.
- Find a teardown reference for your exact model and note hidden screws/clip locations.
- Have replacement pads/paste ready before opening; leaving a device open while waiting for parts increases risk.
-
Power isolation and battery safety
Unplug power, then discharge residual power (hold power button briefly after unplugging, if your model allows). On laptops, disconnect the internal battery as soon as you can access it.
- If the battery looks swollen, stop and do not continue disassembly.
-
Controlled disassembly and screw tracking
Remove the bottom cover or shroud using the correct driver size. Record screw positions and lengths; mixing long screws into shallow holes can damage the board or case.
- Use a plastic spudger for clips; avoid metal prying near the motherboard.
-
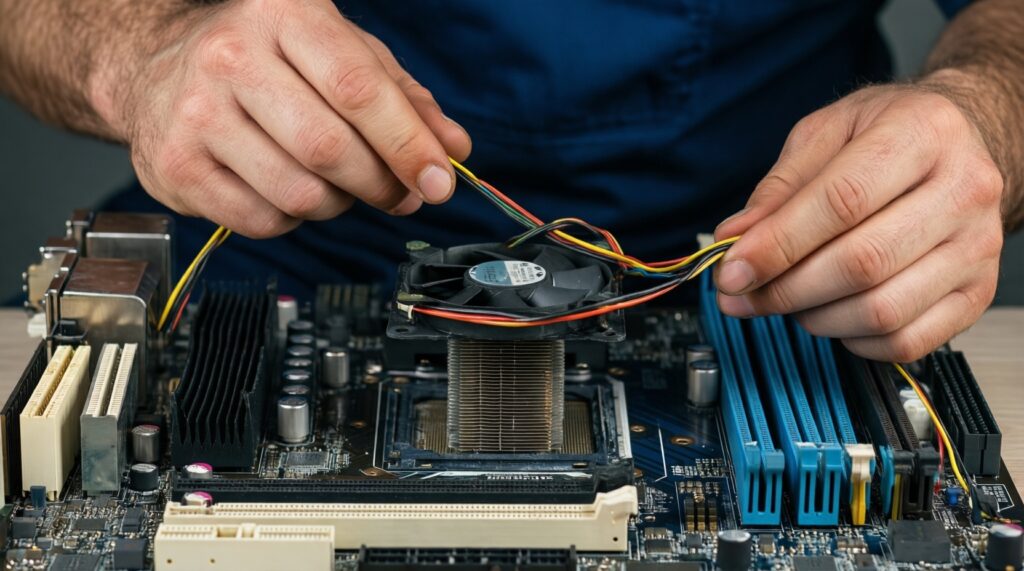
Heatsink removal without PCB stress
Loosen heatsink screws gradually in a cross pattern to reduce uneven pressure. If the heatsink is "stuck," gently twist to break suction-do not pull straight up aggressively.
- Disconnect fan cables by the connector housing, not the wires.
-
Surface cleaning and residue control
Remove old paste using lint-free wipes with isopropyl alcohol. Lift old pads carefully; keep a sample to measure thickness if you're reordering.
- Do not scratch dies or cold plates; avoid paper towels that shed fibers.
- Keep alcohol away from speakers, displays, and adhesives.
-
Dry-fit check before final assembly
Before applying paste, confirm every pad location and thickness so the heatsink sits flat. A quick dry-fit can prevent a full rework.
Step-by-Step Replacement Procedure: Disassembly to Clean Surface
Time: 30-90 min (device-dependent). Difficulty: Medium.
Result verification checklist (after you've cleaned and before you close up)
- All old paste is removed from the die and heatsink cold plate; surfaces are clean and dry.
- Pad locations match the original footprint (VRAM/VRM/chokes) and do not overlap exposed components unnecessarily.
- Pad thickness matches the original (measured or verified); no "stacking pads" to reach height.
- No loose fibers, dust, or dropped screws remain inside the chassis.
- Fan blades spin freely; no cables touch fan paths.
- Battery connector (laptop) is fully seated and locked (if your model has a latch).
- Heatsink screws are ready to tighten in a cross pattern; threads catch smoothly (no forced cross-threading).
- Connectors you unplugged are reconnected: fans, RGB headers (desktop), speaker/IO ribbons (laptop), Wi‑Fi antennas (if moved).
Application Techniques: Amount, Pattern and Pad Placement - Common Pitfalls
Time: 10-20 min. Difficulty: Medium.
- Using too much paste: excess squeezes out and can contaminate nearby components; apply a small, controlled amount.
- Using too little paste: thin spots create hotspots; ensure full coverage once the heatsink is tightened.
- Over-spreading with tools: aggressive spreading can trap air; for most pastes, a small central deposit is sufficient once pressure is applied.
- Touching cleaned surfaces: fingerprints reduce contact quality; handle heatsink by edges.
- Wrong pad thickness: the #1 cause of "temps got worse after service." Too thick prevents die contact; too thin fails to cool VRM/VRAM.
- Forgetting protective films: many pads have film on both sides; remove both before mounting.
- Misaligned pads: pads can slide when placing the heatsink; position them so they won't shear or fold.
- Uneven screw tightening: tighten in a cross pattern in small increments; uneven pressure increases pump-out risk over time.
- Mixing pad materials randomly: combining very soft and very stiff pads across the same heatsink can tilt contact; keep pad type consistent per contact plane.
Reassembly, Thermal Validation and Scheduled Maintenance Plan
Time: 20-45 min validation. Difficulty: Easy-Medium.
Reassembly and validation sequence
- Close in reverse order and reconnect everything you unplugged; for laptops, reconnect the battery last, just before the bottom cover goes on.
- First boot check: verify fans spin, no burning smell, no sudden shutdowns, and temperatures at idle look reasonable.
- Load test: run the same workload you used for diagnosis; compare peak temperature, sustained clocks, and fan behavior to your baseline.
Maintenance alternatives (choose what fits your situation)
- Professional service: best when you can't confirm pad thicknesses or the device has fragile ribbon cables; this is often the safer route than a rushed DIY เปลี่ยนซิลิโคนระบายความร้อน.
- Dust-only service: if temps are only slightly elevated and paste is not very old, cleaning fans/heatsink fins may be enough with lower risk.
- Targeted GPU-only repaste (desktop): practical when GPU temps are the sole issue and CPU temps are fine.
- Deferred pad replacement: if pads are intact and thickness is uncertain, replace paste now and plan pads later when you can measure/order correctly.
Troubleshooting: Rapid Solutions to Typical Post-Service Issues
My temperatures got worse after changing paste/pads. What's the fastest fix?
Recheck pad thickness and whether the heatsink sits perfectly flat on the die. The next most common cause is uneven screw tightening; redo the cross-pattern tightening in small increments.
Why won't the device power on after reassembly?
Check battery and power connectors first, then fan and display/ribbon cables you may have disturbed. Also confirm no screw is lodged under the motherboard causing a short.
Why do the fans spin at 100% immediately after boot?
A fan cable may be partially seated or the heatsink is not making proper contact, causing rapid heat-up. Power off and inspect connectors and mounting pressure.
I see paste squeezed out around the chip-did I ruin anything?
If the paste is non-conductive, it's usually not electrically dangerous, but it's messy and can trap dust. Clean the excess and reapply a smaller amount.
After replacing pads, the heatsink doesn't "reach" the die properly.
This strongly indicates pads are too thick or stacked. Replace with correct thickness pads; do not force the heatsink down to compensate.
Temperatures improved, but they degrade again quickly under the same workload.
Recheck for dust blockage and confirm screws stayed tight after a few heat cycles. On some devices, high mounting pressure or a poor paste choice can cause faster pump-out.

